Email us at:
uwfithelp@uw.edu
Please contact our team before UWIT via help@uw.edu. If we cannot assist you directly, we can assist you in navigating UWIT to see that your issue is resolved. If you believe your computer/NetID has been compromised email security@uw.edu and add uwfithelp@uw.edu to the Cc block.
For urgent requests, please CC your manager and/or other affected parties.
Please include any relevant images, file attachments and any other relevant information; however, exercise caution when handling sensitive information.
Frequently Asked Questions
- Spam & Phishing Emails
UW-IT filters spam and phishing emails. To learn more about this, visit UW-IT's "Protecting Your Email" page.
Before you take any actions, identify the email you got:
- Spam is unsolicited email, typically trying to have you buy something
- Phishing is a type of spam where the sender is having you provide information, take certain actions, etc.
Regardless of type of email, DO NOT click on external link
- If the email is a spam, send an email as an attachment or forward it to reportedspam@cac.washington.edu
- If the email is a phishing, send an email as an attachment or forward it to help@uw.edu
- VPN Connection Issues
There are many variables that contribute to unstable VPN connections, including the server, Wi-Fi load (the number of people using the network and their level of usage), the internet provider's outage, and potentially many more. But UW-IT's FAQ page covers a lot of the questions you might have.
- The File Explorer is slow
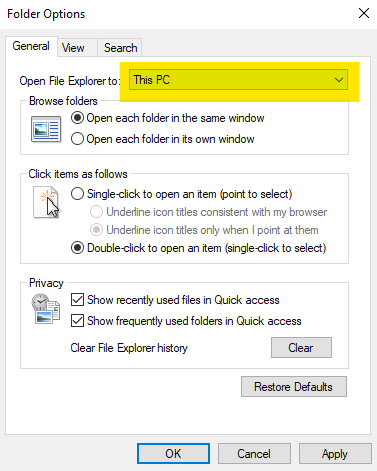
- Open up the File Explorer.
- Click View and Option.

- Change "Open File Explorer to: to "This PC" instead of "Quick Access".

- The monitor does not display anything
Check for the connections. Each monitor should have at least two cables connected. Try pressing the power button on the monitor. If the power button press does not cause an orange light to turn on, ensure that your cables are properly connected to the outlet.
- Request an ergonomic mouse/keyboard
Fill out the help request form provided in the link above. If there isn’t a spare mouse/keyboard, then it may take a few days to replace the mouse/keyboard.
- Outlook is displaying "Working Offline"
Go to Send / Recieve tab at the top of the Outlook. Check to see if the "Work Offline" feature is toggled on as below.
