- Disposition Review Process For Records Authority
- Quick Overview
- Step by Step Guide to Reviewing and Approving a Disposition Job (Records Authority)
- Correcting Misclassified Records (Re-Indexing Records)

Disposition Review Process for Records Authority
The role of the Records Authority is to review and approve all disposition jobs. Reviewing may sometimes involve re-indexing incorrectly classified documents and, in certain instances, placing records on destruction hold. Once the Records Authority approves the disposition, the job advances to Records Management for final approval.
Note: If your office has a Records Coordinator, they will be the first to receive the initial notification email from DocFinity.
Quick Overview
- Receive email (with link to DocFinity) inviting RA to review records eligible for disposition
- Once logged into DocFinity, select RA job queue
- Check out a specific job under “Jobs: RM Review: Record Authority”
- Review records
- Check for any errors and make necessary corrections, as needed. Errors that can be fixed through re-indexing include:
- Incorrect Record Category
- Incorrect Record Type
- Incorrect Record Retention Trigger Date (RRTD)
- Check if any legal holds need to be applied. For instructions on how to place a legal hold, please visit the Legal Holds Process in DocFinity guide
- Check for any errors and make necessary corrections, as needed. Errors that can be fixed through re-indexing include:
- Approve disposition
- Review records
Step by Step Guide to Reviewing and Approving a Disposition Job (Records Authority)
Step 1. Visit edms.uw.edu and log in using your UW NetID and password.
Note: For direct access to the disposition job, you can also click on the link in the disposition notification email you received from DocFinity.
Step 2. At the top of the webpage, click on the Workspaces tab – a drop-down menu appears. In the drop-down menu, click on Job Assignments.
Step 3. Four panels have populated your workspace (from left to right): Search, Jobs, Job Views and Results.
Step 4. In the Job Views panel, select RM Review: Record Authority, then click on the Get Job Queue button at the bottom.
Note: Your Job Views panel may look different depending on access level and role.
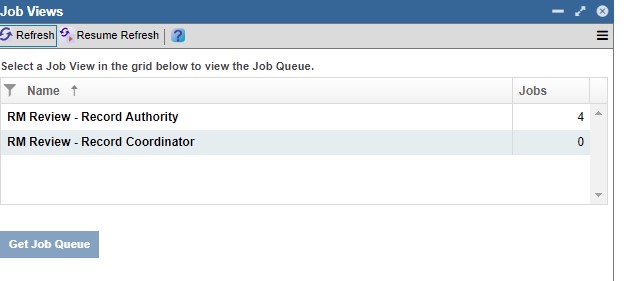
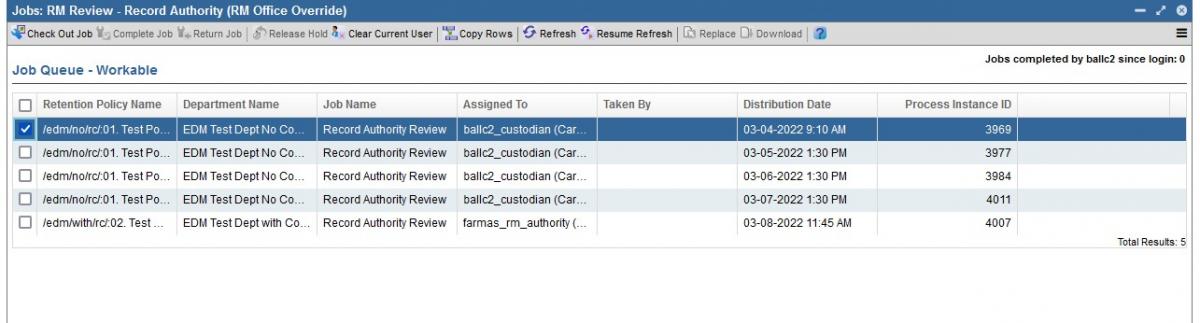
Step 5. In your job queue, disposition jobs are listed by retention policy, from oldest to newest. Each row represents a separate job and disposition-eligible records are batched by retention policy (AKA record series). Select a job from the queue by clicking on it so that it becomes highlighted in blue. (You can unselect it by clicking on it again.) Once you have selected a job, click on the Check Out Job button at the top.
Step 6. A new panel opens up with three tasks: Review Disposition Instructions and Notes, Review Documents via Search Result (by Disposition Queue ID), and Approve Disposition or Report Issue to Records Management. Tasks marked with an asterisk * are required to be fulfilled in order to complete the whole job.

Step 7. Click on the first task titled Review Disposition Instructions and Notes - a new panel appears.

Step 8. The Review Disposition Instructions and Notes panel contains links to the disposition process guides for each role and any notes the Records Coordinator (if applicable) may have left for this specific job. You may wish to leave a note that will be visible to the RM Compliance Analyst.

Note: With any panel you have the option to either diminish it, enlarge it, open it in a new window, or close it completely by clicking on the respective icons.

Step 9. Click on the second task * Review Documents via Search Result (by Disposition Queue ID) to view all disposition-eligible documents in the batch.

Step 10. Depending on the size of the job, you may have to review multiple pages worth of documents. Click the icon with the small arrow to navigate to the next page. Alternatively, you may click on the drop-down menu next to “items/page” to expand the number of results per page.

Step 11. Optional: DocFinity also gives users the option to export the metadata of all listed documents under Results to a spreadsheet. Click on the Export Results to Spreadsheet button at the top. (If you do not wish to export the results to a spreadsheet, go to Step 15.)

Step 12. A message appears at the top of your browser. DocFinity will prepare a .csv file that will contain all the metadata associated with the records listed in the Results panel.
Note: Export Results to Spreadsheet downloads metadata only and not any actual documents.

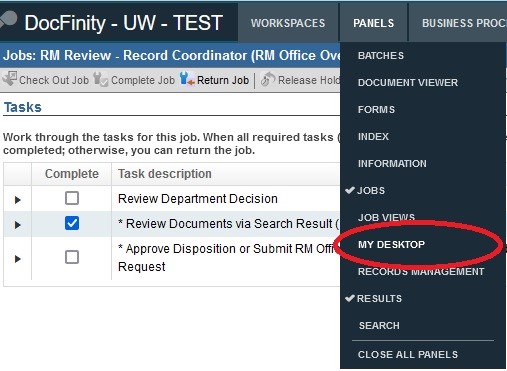
Step 13. To download the file from DocFinity, select the Panels tab at the top. In the drop-down menu, select My Desktop.
Note: You should also receive a UW email with a unique link when the file is ready allowing you to download it.
Step 14. From the Export Queue, you can download the .csv file and view the metadata of records eligible for disposition in this .csv file.

Step 15. Back in the Results panel, you can also double-click on individual record to review specific items.

Step 16. After clicking on the individual record from the Results panel, the Document Viewer panel will open at the top of the screen.

If the file size is above 30MB, DocFinity will be unable to display the record in the Document Viewer section. Additionally, certain file formats may not be supported by the viewer. To view the file under these circumstances, select the individual document you wish to view by clicking the checkbox in the Results panel, and then click on the Download button located in the toolbar above. This should prompt DocFinity to download the document.

Step 17. Once your review is complete and no corrections need to be made to any of the documents in the Results panel, you can approve the job. Select the third task by double-clicking on the *Approve Disposition or Report Issue to Records Management under the Tasks menu.

Step 18. A dialogue box will appear once you click on that task, and you will have two choices: Approve Disposition (of all records) and Report Issue to Records Management (please see outline issue below).

Step 19. If you have any issues with the disposition batch that you are reviewing, you may select select the Report Issue to Records Management option from the drop-down menu. Outline the issue(s) in the description so Records Management can review your comments and contact you.

Note: If you find any records in a disposition batch that are responsive to a destruction hold, follow the instructions on placing a record on a legal hold.
Step 20. If you want to approve the disposition of all records in the batch, select Approve Disposition (of all records) from the drop-down menu below and click on the Save button at the bottom of the dialogue box.

Step 21. The last step is to click on the Complete Job button located in the Jobs panel toolbar. Once completed, the disposition job advances to the RMS Compliance Analyst for review.

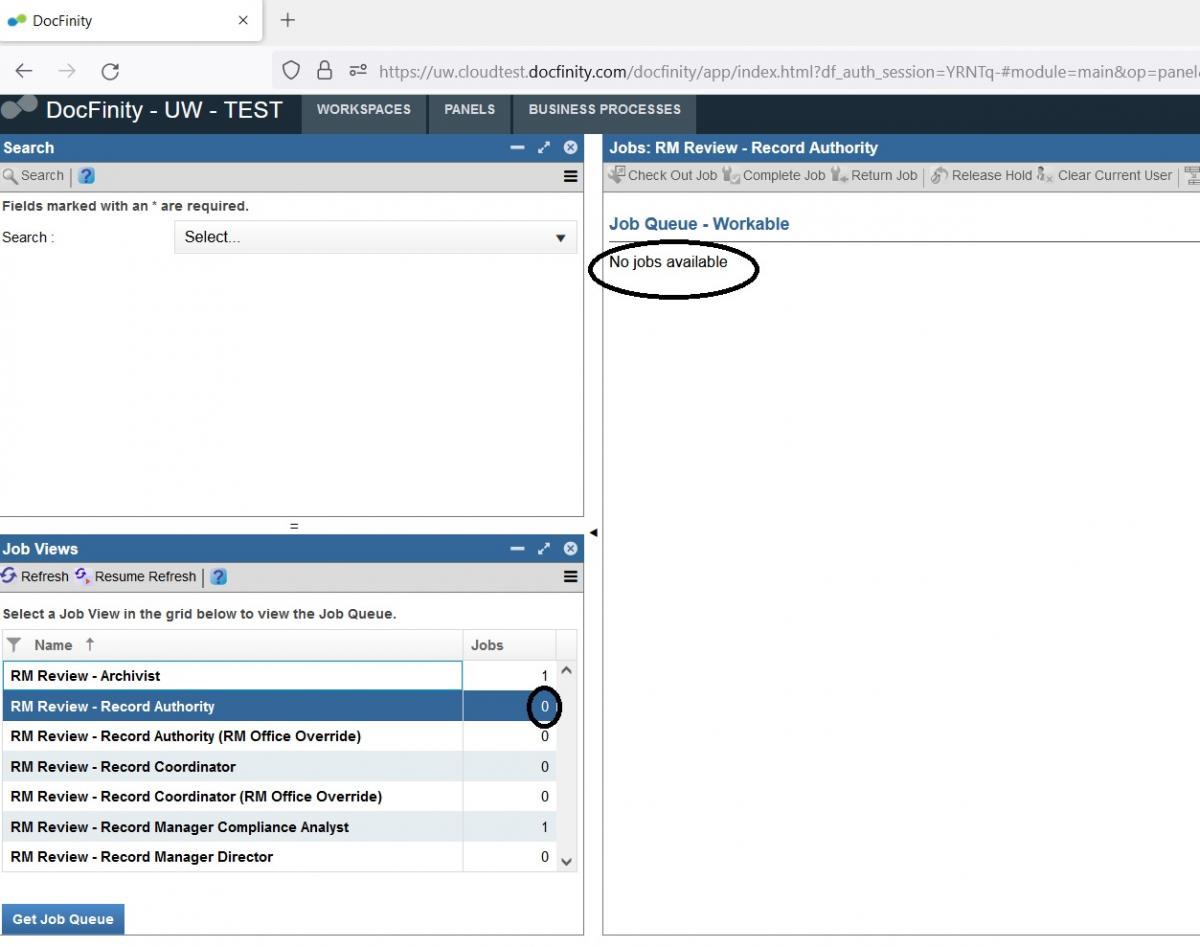
Step 22. Looking at your Job Queue, you can see the number of jobs decreased by one, which means you have successfully completed the disposition job. If applicable, continue this process until the Job Queue is at zero.
In this example, you can view that there are no more jobs for the Records Authority and that the job was successfully completed.
Correcting Misclassified Records (Re-Indexing Records)
During your review you may discover a problem with one (or multiple) record(s), such as wrong record type or incorrect RRTD (Record Retention Trigger Date). It is important to correct any mistakes and re-index the record because an incorrect record type and/or incorrect RRTD may result in the record being disposed of prematurely.
Note: If you require all records in a batch to be corrected and re-indexed, please contact Records Management at recmgt@uw.edu for assistance.
Step 1. Starting from the Review Documents via Search Result job task
Step 2. Click on the row of the document from the Results panel that needs to be updated.
- Next, either click on the Re-Index button in the toolbar or use the context menu to click on “Re-Index”.
- This will bring up the Index panel on the right hand side

Step 3. Under the Re-Index panel, update the "Record Retention Trigger Date" field or the "Record Type" field as appropriate. After you are done with edits, click on the "Save" button in the top toolbar of the Index panel to save the changes.

Step 4. After you update the RRTD or Record Type of any record, a notification pops up at the top indicating that the document was successfully re-indexed and the number of “Total Results” at the bottom of the Results panel should show a decrease.

Note: In previous iterations of DocFinity, re-indexing required postponing the entire disposition batch. However, the latest version makes that step obsolete as DocFinity now promptly removes the affected records from the batch. Each time you use Re-index the search results refresh. Depending on how many total results there are this may take a few minutes.
Step 5. Click on the Approve Disposition or Report Issue to Records Management job task.

Step 6. Once DocFinity refreshes, a dialogue window pops up allowing you to approve the disposition. Alternatively, if you encounter any issues that you need to report to Records Management, you can do the following:
- Select Report Issue to Records Management from the drop-down menu.
- Describe the issue you've encountered. Doing so will pause the disposition process.
- Click on the Save button at the bottom of the dialog box.
Step 7. At this point all required tasks are marked as complete. The last thing to do is to click on the Complete Job button in the top toolbar to send the job to the RM Compliance Analyst. If you encountered and reported an issue, the disposition will be paused and Records Management will review and investigate until the issue can be resolved. Once resolved you will receive an updated disposition job the following week.

Important
In the event of litigation, Public Records Request, audit, or investigation, you may need to place a record on hold. When this happens, you must contact Records Management Services. To learn how navigate destruction holds in DocFinity, follow this step-by-step Legal Holds Process in DocFinity.