Optical Character Recognition, or OCR, is a technology that recognizes text within a digital image. The process of converting a scanned image into recognizable characters can make scanned documents searchable, in order to locate unique key terms or phrases within the file. You may have a scanned document that is 200 pages long, but you only need to find the pages that mention your Department’s name. Or maybe you have an entire shared drive of scanned documents, and you need to find every document that contains a specific budget number. This resource will explain how to convert PDF files to make the text recognizable and then will explain how to best search for these files.
As we move toward a digital future, it is time to move away from paper and enhance your electronic data. Scanning paper records is a fantastic way to make information more accessible and secure. Unfortunately by default, a scanned document is little more than a high-definition photograph. As a result, users cannot easily make edits to the content of those scanned images and cannot easily search the file contents.
 Imagine you scanned a document that featured the University of Washington crest. While our eyes can read and interpret that the scanned image says ‘University of Washington’ and ‘1861’, your computer program may not automatically recognize or interpret that the scanned document has readable characters. As a result, once scanning a record, the only way for users to easily know what the file contains is by strategically using folder structures, file naming conventions, and actually reading the document.
However, there are amazing tools available at your fingertips that can turn scanned documents into valuable information assets by converting a scan into searchable characters. This process of converting scanned images into searchable characters is known as Optical Character Recognition, or OCR. By applying the OCR process to the example image above, the software can understand that the scanned document above features the words ‘University of Washington’ and ‘1861’. Once the scanned document is converted, users can easily search within an individual document or across folders’ worth of documents for specific words or phrases.
One of the easiest programs to conduct this OCR conversion process is within Adobe Acrobat Pro. It is recommended to scan paper records into PDF files and so Adobe Acrobat Pro is an obvious choice when handling PDF files. However, an Adobe Acrobat Pro subscription is required to use these capabilities. You will not be able to use the OCR conversion process using Adobe Reader.
There is no need to convert most Microsoft Word, Excel, or PowerPoint file formats. That is because text is already recognizable within those programs and users already have the ability to edit or make changes to content within those file types. Instead, this resource will be able to guide users on how to OCR PDF files and how to use the advanced search functions once doing so.
OCR also helps make a document more accessible. Refer to UWIT’s website for more information regarding accessibility guidelines.
Learn how to:
OCR Convert PDF files using Adobe Acrobat Pro:
Search for Text
- Find Text Within One PDF Document
- Search Across PDF Documents Using Adobe Advanced Search
- Search Across Folders Using Windows Search Features
Recognize Text in One PDF Document
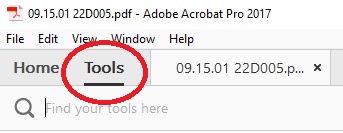
The OCR process within Adobe Acrobat is known as Recognize Text. The first step is to open the PDF document you will want to enable for enhanced search capabilities. Then in the tool bar across the top of the document:
- Press Tools
- Click Enhance Scans
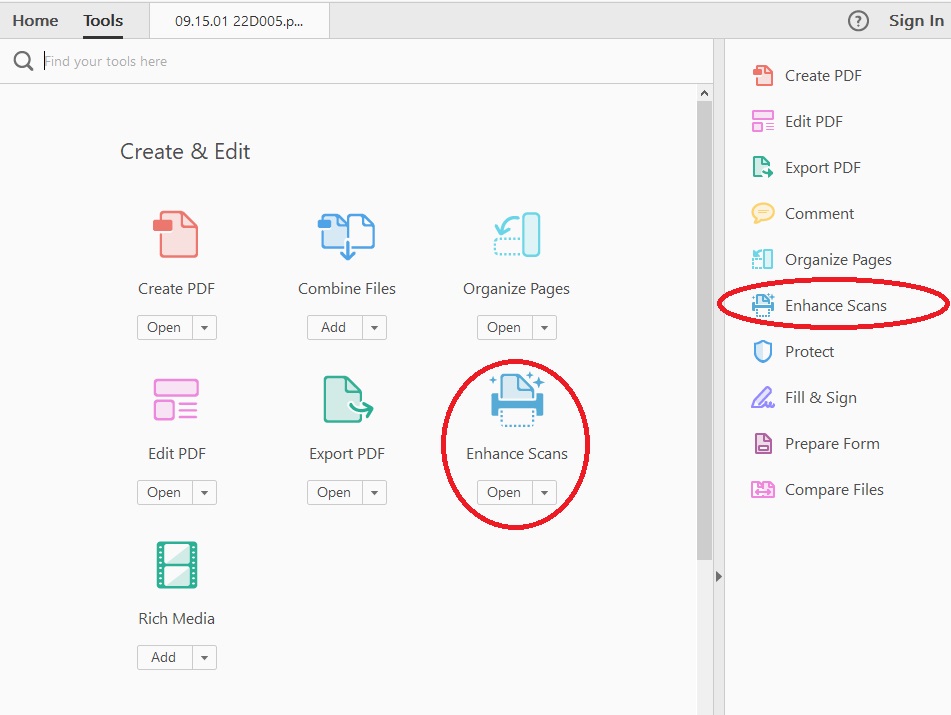
- On the top tool barthere will be a number of new options including Insert; Enhance; Recognize Text
- Click on the AA Recognize Text and a drop down menu will appear

- Click on the In This File Button

- A new toolbar will appear

- Ensure that:
- All Pages is selected
- Language: English (US)
- The settings should read:
- All pages
- Document Language: English (US)
- Output: Searchable Image
- Downsample To: 600 dpi
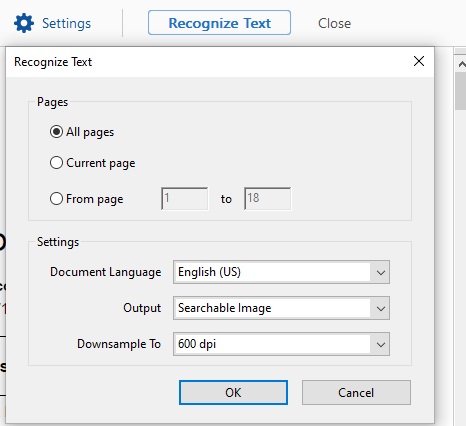
- Click OK
- A new toolbar will appear
- Click the Recognize Text button

- A status bar will appear at the bottom of the page while Adobe Recognizes the Text in the PDF document

- Be sure to Save the document you have open once the conversion is complete.
- Pressing save and overwriting the existing file is prudent. By overwriting the existing file, you eliminate the creation of duplicate copies. The OCR process is not actually changing the content of the scanned record and so there is no need to maintain two copies of the same file.

- Pressing save and overwriting the existing file is prudent. By overwriting the existing file, you eliminate the creation of duplicate copies. The OCR process is not actually changing the content of the scanned record and so there is no need to maintain two copies of the same file.
Recognize Text in Multiple PDF Documents
You may have an entire folder filled with previously scanned documents that you want to enhance. These instructions will allow you to OCR convert multiple PDF documents at once.
Warning: You will not be able to open other Adobe PDFs while the recognition process is occurring, so be sure to plan ahead. If you have more than ten files or the files are hundreds of pages long, consider waiting until the end of the day to do it so it can process everything while you are away from the computer.
- Open a PDF document
- Click on Tools
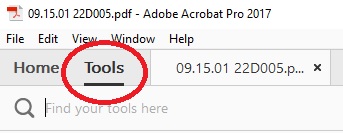
- Click on Tools
- Click Enhance Scans
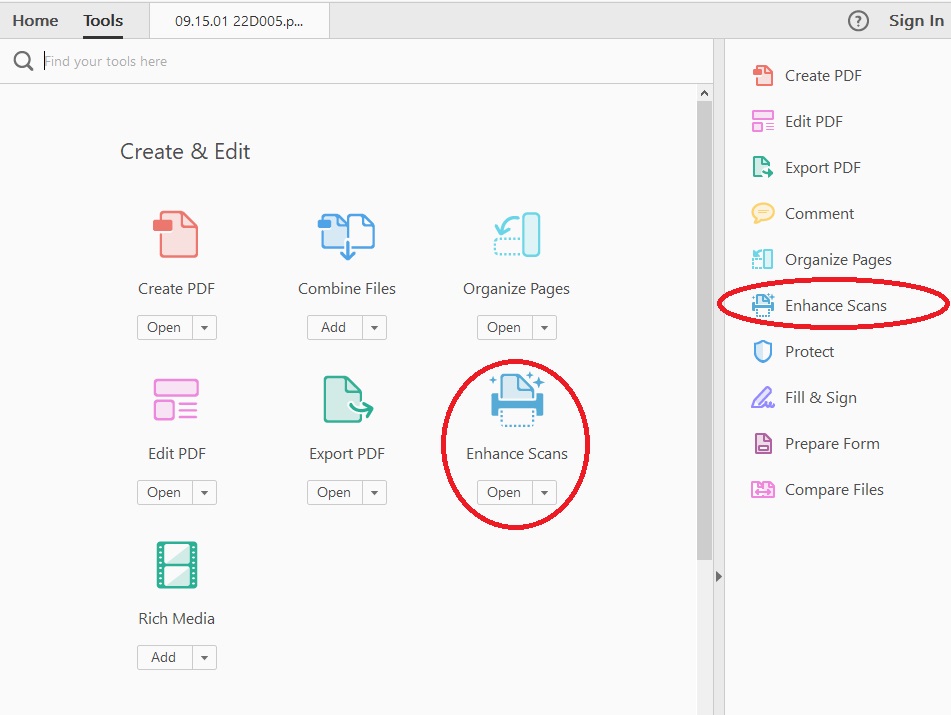
- On the top tool bar at the top of the window, there will be a number of new options including Insert; Enhance; Recognize Text
- Click on the AA Recognize Text and a drop down menu will appear

- Click on In Multiple Files...

- A pop up will appear with the document you were just working on, already listed
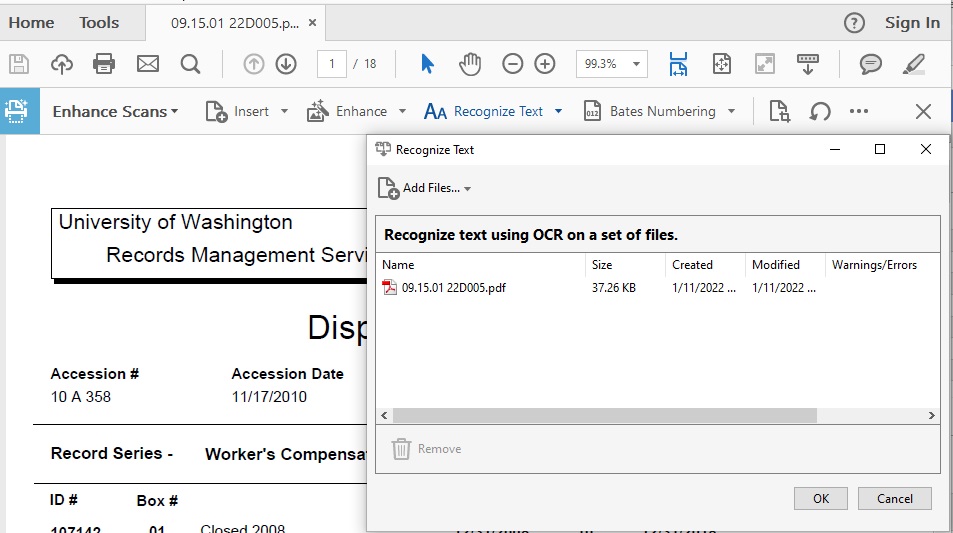
- Add other files to recognize text:
There are two ways you can do this. One way is to search for files within the program and select them to be added to the queue (Option A). Alternatively, you can manually drag and drop files into the queue (Option B).- Option A:
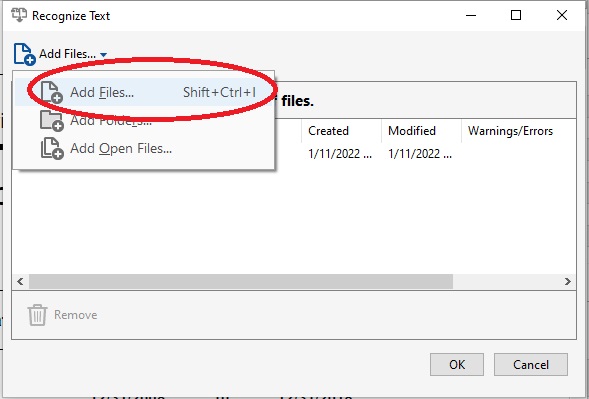
- In the top left there is an Add Files... button
- Click on that button
- From the drop down menu, select Add Files...
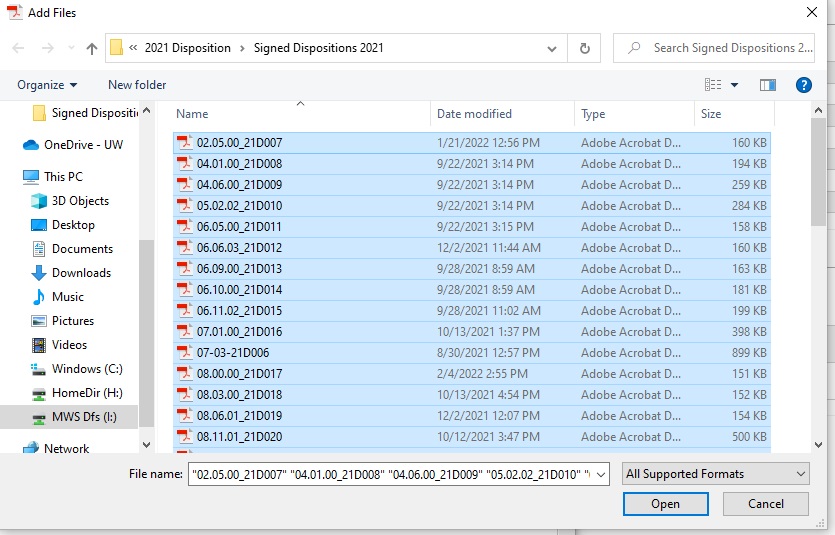
- Select the additional files you would like to recognize text in.
- You can select multiple documents by holding the Ctrl button
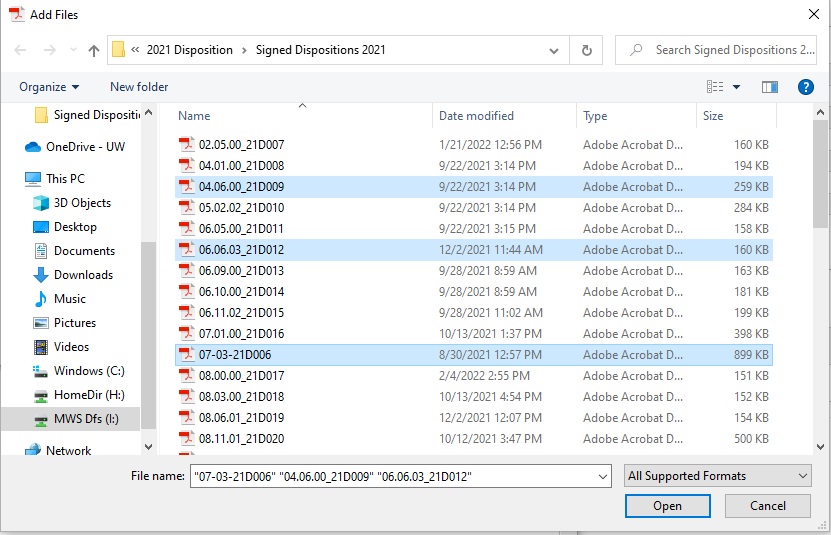
- You can select all documents in a folder by pressing Ctrl + A
- You can select multiple documents by holding the Ctrl button
- Click Open
- The PDF document or multiple PDFs will now be added to the list.
- Repeat this process for all the PDF files you want.
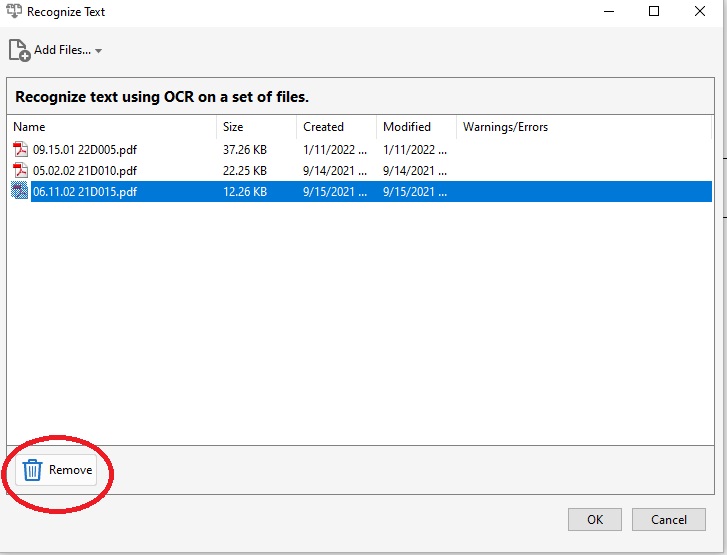
- If you wish to deselect files that have been placed in the popup for text recognition, click on the file name so that it is highlighted. Press the Remove button found in the bottom left hand corner
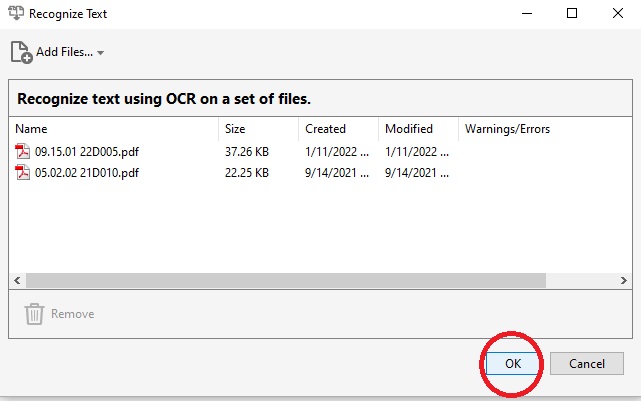
- Once you are ready, press the OK button
- In the top left there is an Add Files... button
- Option B:
- Alternatively, you can drag and drop files from your windows file structures into the white space of the adobe list. You will need to open the source folder and Adobe Acrobat so you can view both applications on the same screen.
- You can select multiple documents by holding the Ctrl button. Once selected, just drag and drop into the white space on the Adobe Acrobat screen.
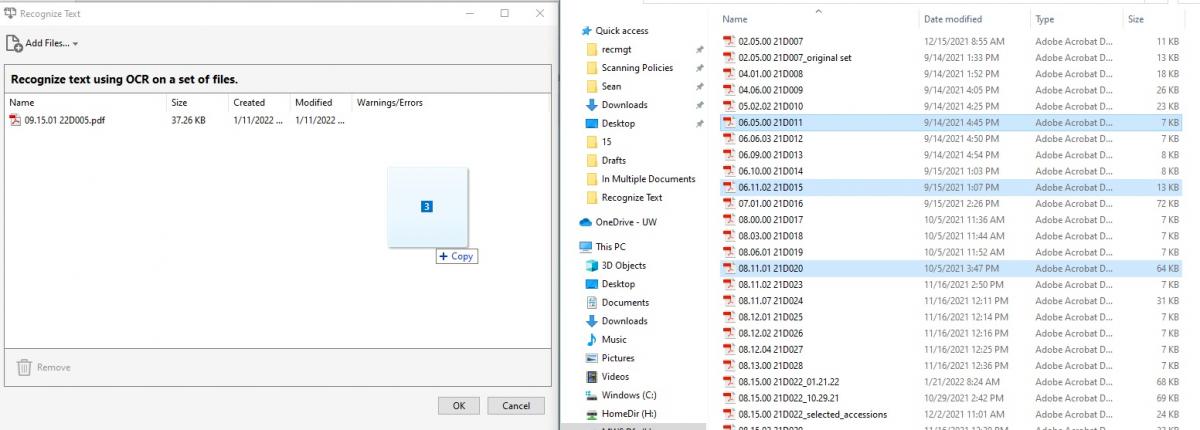
- You can select all documents in a folder by pressing Ctrl + A. Once selected, just drag and drop into the white space on the Adobe Acrobat screen.
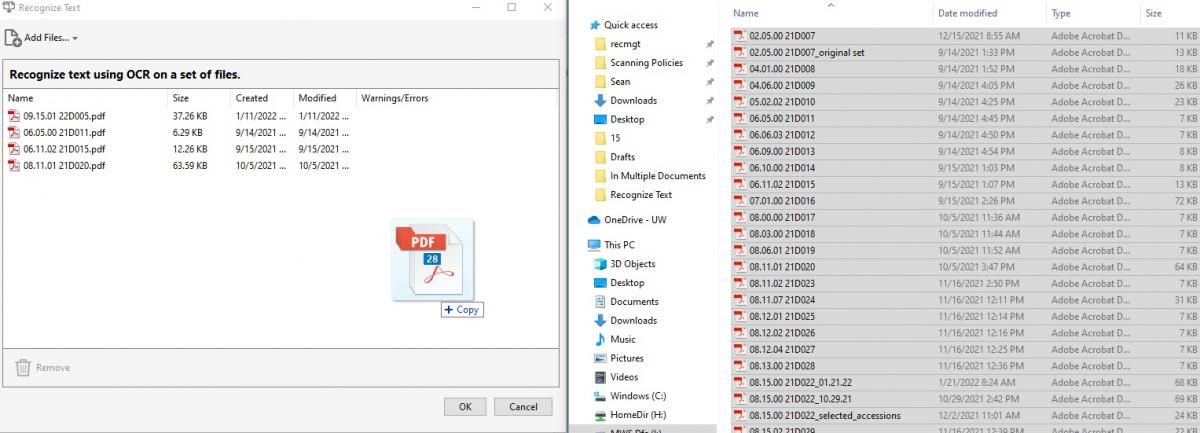
- You can select multiple documents by holding the Ctrl button. Once selected, just drag and drop into the white space on the Adobe Acrobat screen.
- The PDF files will be added to the list once you release your cursor
- You can repeat this drag & drop process until all files are added.
- If you wish to deselect files that have been placed in the popup for text recognition, click on the file name so that it is highlighted. Press the Remove button found in the bottom left hand corner
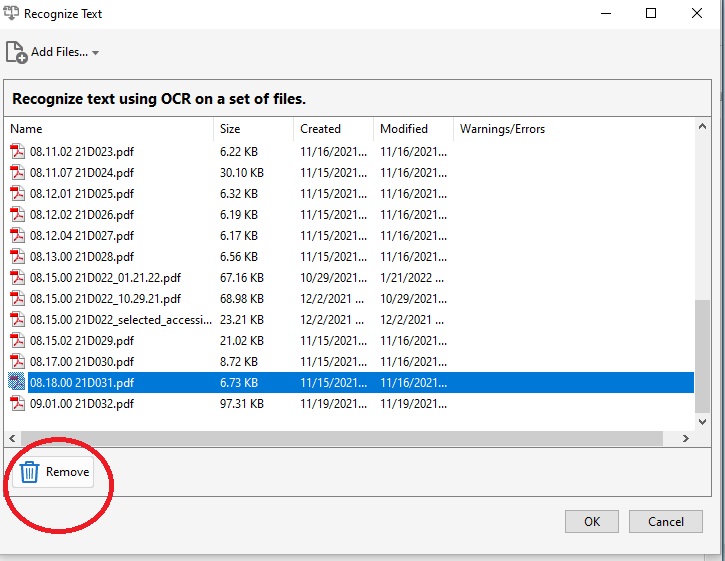
- Once you're ready, press the OK button
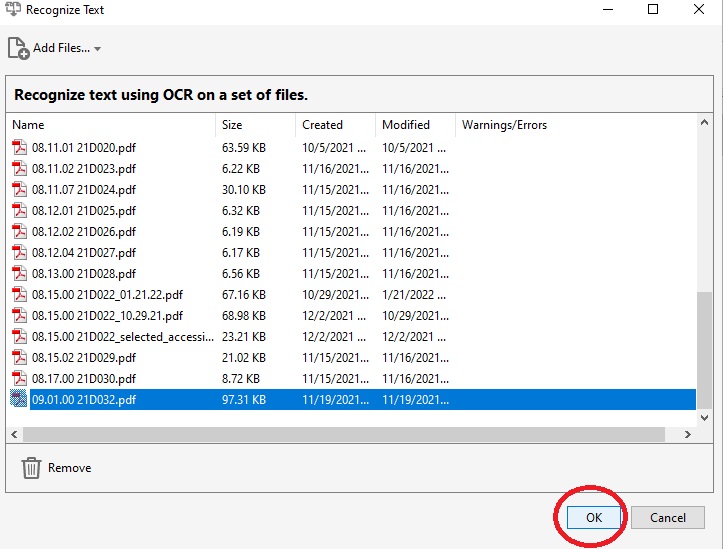
- Once pressing OK, A new pop up will appear
- Keep all the settings and choices the same
- Target Folder: The Same Folder Selected at Start
- File Naming: Keep Original File Names
- Overwrite existing Files is checked
- Press OK
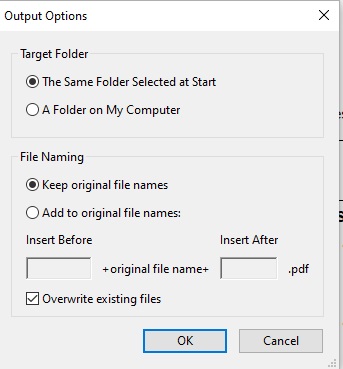
Overwriting the existing files is prudent. By overwriting the existing files, you eliminate the creation of duplicate copies of the same record. The actual content of the record will remain unchanged. All this process is doing is making the existing content more accessible and searchable.
- A pop up will appear
- Keep Pages as “All Pages” selected
- Keep Settings as they are
- Document Language: English (US)
- Output: Searchable Image
- Downsample To: 600 dpi
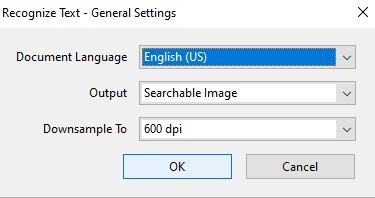
- Keep all the settings and choices the same
- A status bar will appear while Adobe Recognizes the Text in all the PDF documents

- Alternatively, you can drag and drop files from your windows file structures into the white space of the adobe list. You will need to open the source folder and Adobe Acrobat so you can view both applications on the same screen.
- Option A:
Find Text Within One PDF Document
The instructions below allows you to locate a specific word or phrase within a PDF document that you have converted using the OCR process.
- Open a PDF Document using Adobe Acrobat Pro
- Go to the Edit tab, located in the top left corner

- Click on Find (or press Ctrl+F)
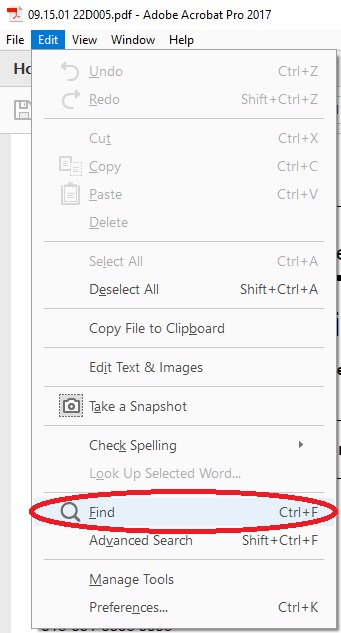
- A popup will appear titled Find
- Type the word or phrase you would like to search for
- Click Next

- Starting on the page you are on, Adobe will search for each instance in the document matching the search parameters and highlight them
- Clicking Next will bring you to next result in the document
- Once you have no more new search results, a pop up will appear stating that no more matches were found

- If you want to do a more advanced search within a document, refer to the instructions below for using the Advanced Search features
Search Across PDF Documents Using Adobe Advanced Search
The instructions below allows you to locate a specific word or phrase within any and all PDF records that have had their text recognized. Perhaps you’re looking for a budget number across multiple files and folders. Perhaps you’re looking for a student or faculty name. This method will locate all instances the key word or phrase appears.
WARNING: Before you begin, please be sure to always keep one PDF Document open at all times when using the Advanced Search. If you close the last PDF Document, it will close the entire Adobe Acrobat application, along with your Advanced Search results.
- Open a PDF Document using Adobe Acrobat Pro
- Go to the Edit tab, located in the top left corner

- Click on Advanced Search (or press Shift+Ctrl+F)
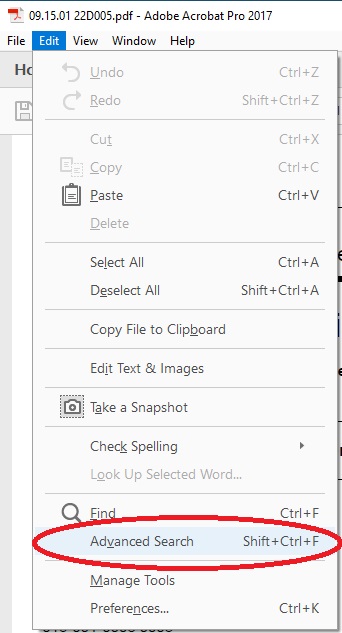
- A popup will appear titled Search
- Click on the circle next to: All PDF Documents in
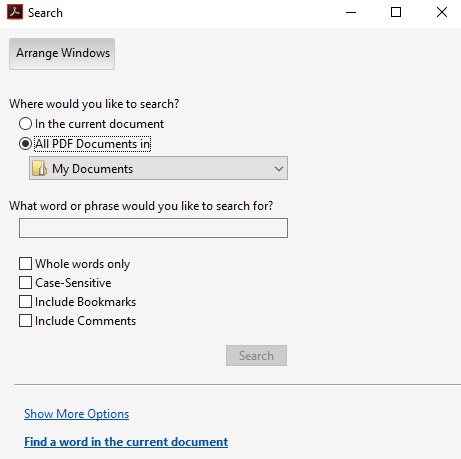
- Click on the folder drop down menu and choose which folder you would like to search in.
- If you do not find the folder you would like in the suggested list. Select Browse for Location...
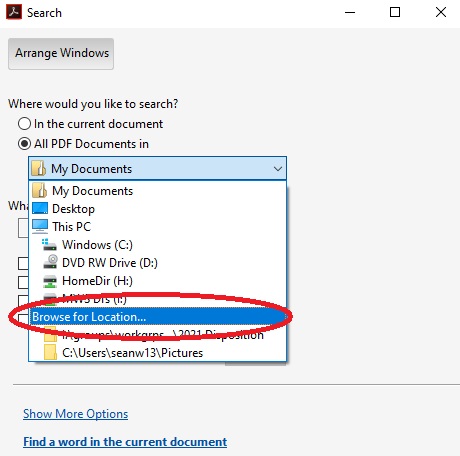
- In the new pop up, browse and find the folder you like to search within and press OK
- In the new pop up, browse and find the folder you like to search within and press OK
- If you do not find the folder you would like in the suggested list. Select Browse for Location...
- Type the word or phrase you would like to search for
- Choose any of the four checkbox selections if applicable
- Press Search
- Click on the circle next to: All PDF Documents in
- You can then expand the results by clicking the arrow icon next to the document name.
- Doing so will display how many times, and a brief location of where, in the document the word/phrase appears
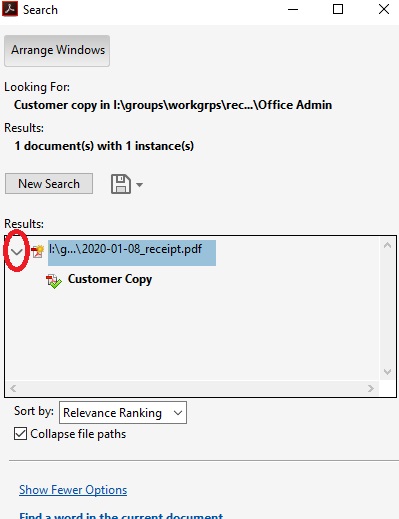
- Doing so will display how many times, and a brief location of where, in the document the word/phrase appears
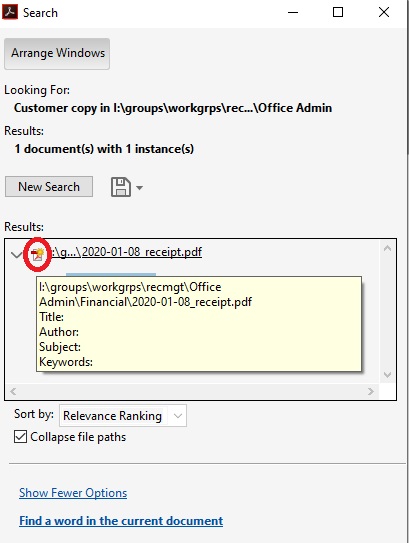
- If you hover your mouse over the small adobe icon or over the title of the PDF, you can find the location of the document.
- If you click on the search result, it will automatically open the PDF document and jump the location within the document of the word/phrase
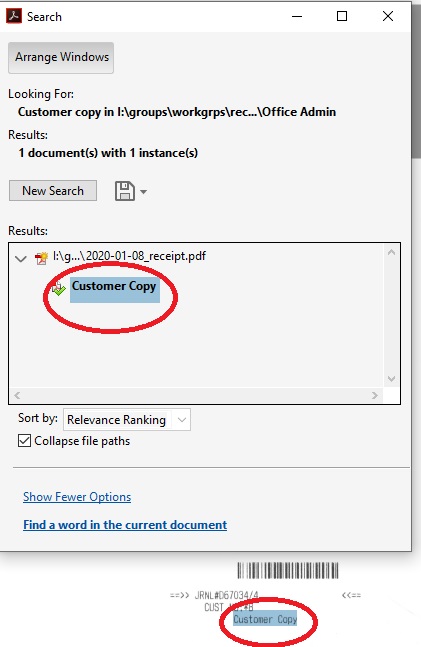
Search Across Folders Using Windows Search Features
The Windows search feature we are all familiar with only searches titles of files. Following the instructions below will allow you to search for and locate a specific word or phrase in individual documents across Windows File Explorer. Once a PDF file has been converted through the OCR processes above, these instructions will help make that PDF discoverable when using Windows File Explorer search functions.
- Open the Windows File Explorer for the top folder you wish the search within
- In this example, doing a search from this folder level will search the loose documents as well as each of the subfolders
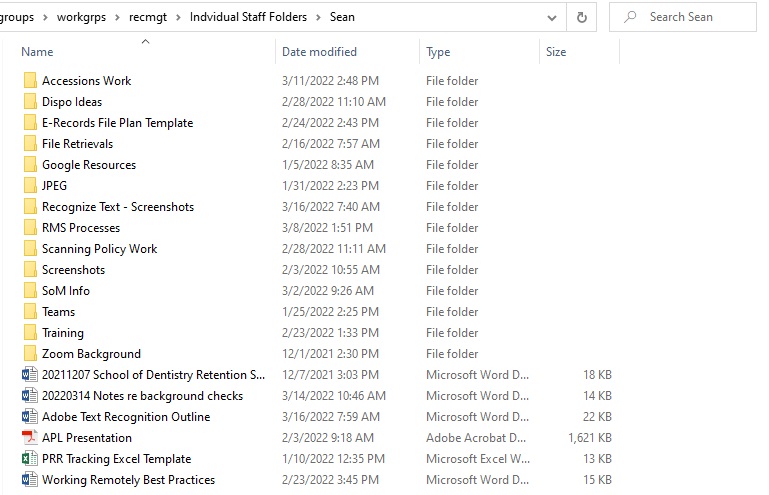
- In this example, doing a search from this folder level will search the loose documents as well as each of the subfolders
- Click in the search window in the top right corner and type your search parameters

- Press Enter on your keyboard to begin the search
- In this example, the initial search led to no search results
- In the toolbar at the top of the page, under Search Tools, click Search

- From this drop down menu of items, you can narrow your search parameters including the file format, file size, tags, and data modified.
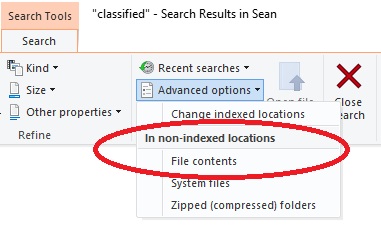
- Click on the Advanced options button
- From the drop down menu, under the In non-indexed locations click on File contents.
- If the check mark is already visible, you can skip this step.
- Once clicking this button, the search will be repeated. But this time Windows will search not only the title of the files, but will search within the contents of your documents.
- If you have recognized text within PDF documents, the PDF documents will appear in the results if they meet your search parameters
- In this example, 3 items were located by changing this setting. One of them was a PDF document with text recognized.
- You can go back to the Search Tools & Advanced options and notice that there is now a check mark next to the File contents.
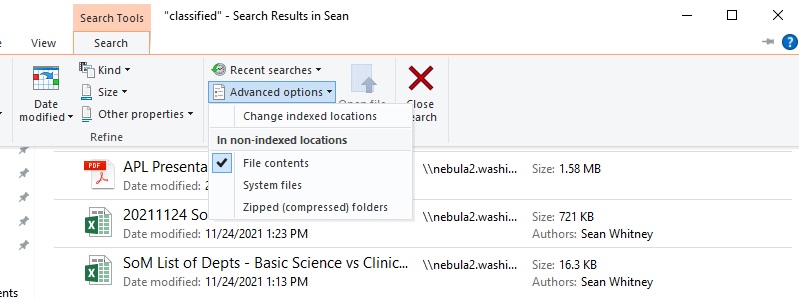
- You are done! If you wish to change your settings back to only searching the file titles and not searching the contents of documents, be sure to uncheck the File contents option.