Because calendars have a specified mandatory retention period, action must be taken to preserve these records (including metadata) when an employee leaves a department or the university. In Outlook, one way to accomplish this is to export a copy of the employee’s calendar to a PST file. The following instructions will walk you through the export process, as well as explaining how to access the saved calendar at a later time.
Before you can save the calendar, you must first create a PST file for the calendar to reside in. This PST file should be stored in a location that:
- is backed-up regularly,
- allows access for those who need it but provides sufficient security should the calendar contain confidential information such as that protected by HIPAA or FERPA,
- and is named clearly so that the PST can be easily located and deleted after the relatively brief retention period is up.
To export a calendar to a PST file:
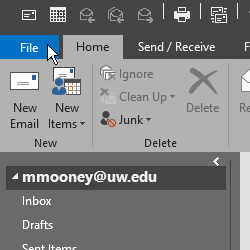
Log into Outlook as the user whose calendar you wish to export and click on the File tab.
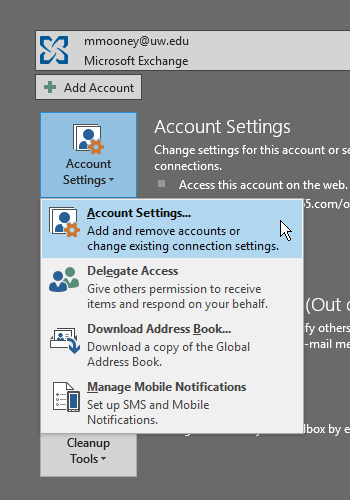
Click on the Account Settings button and choose Account Settings from the sub-menu.

Click on the Data Files tab, then click Add.
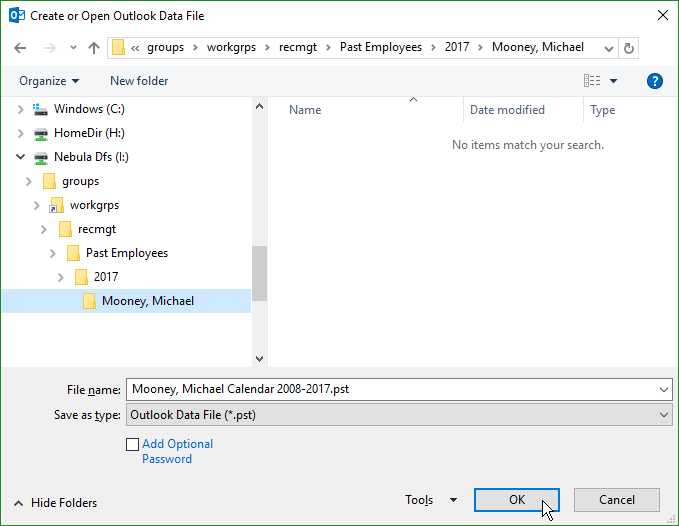
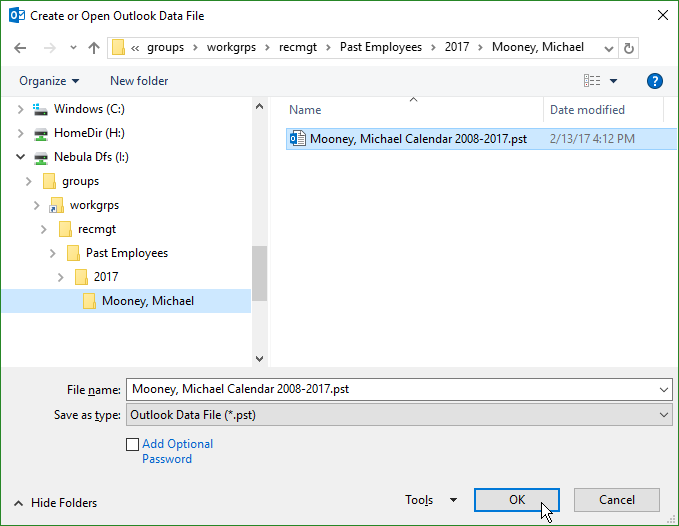
Navigate to the location in which you intend to store the PST file. This location will be someplace outside of email (such as SharePoint or a shared network folder) and should conform to the three criteria outlined at the top of this page.
Give the file a meaningful name (e.g. [LastName], [FirstName] Calendar [InclusiveYears].pst) and click Ok.
Click Close.
You’ve now created a new, empty PST file and it should appear near the bottom of Outlook’s folder list.
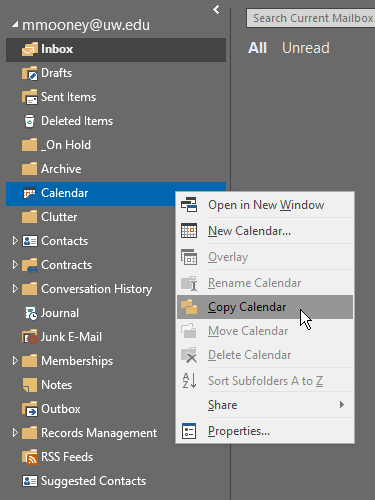
Hold Ctrl and press 6 to switch to Outlook’s Folders view, locate the Calendar folder in the folder list, then right-click on it and choose Copy Calendar.
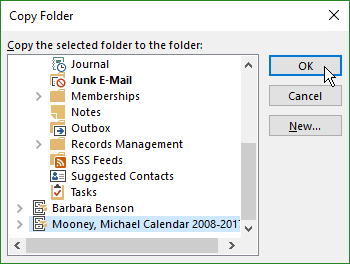
In the new window, scroll down to the bottom of the list, select the PST file, then click Ok.
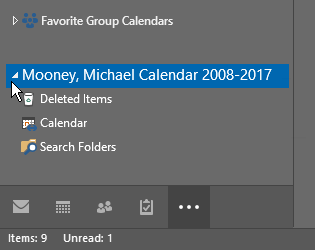
After returning to the Outlook window, scroll down in the folder list until the name of the PST file is found. Click on the arrow to the left of the name to expand the contents.
There should be only three folders: Deleted Items and Search Folders (both empty) and the Calendar folder.
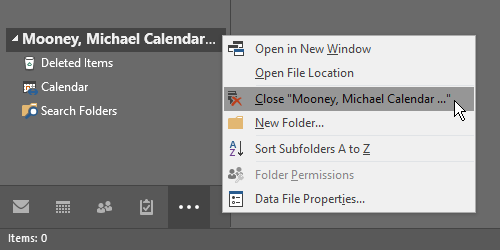
Right-click on the PST file and choose Close.
The PST file should disappear from the folder list.
Hold Ctrl and press 1 to return to Outlook’s normal Email view.
Close Outlook completely to finish saving the PST file.
To access a calendar that has been saved to a PST file:

In Outlook, click on the File tab.

Click on the Account Settings button and choose Account Settings from the sub-menu.

Click on the Data Files tab, then click Add.
Locate and highlight the PST file then click Ok.
Click Close.
Note: A PST file can only be accessed by one user at a time.
Hold Ctrl and press 2 to switch to Outlook’s Calendar view.
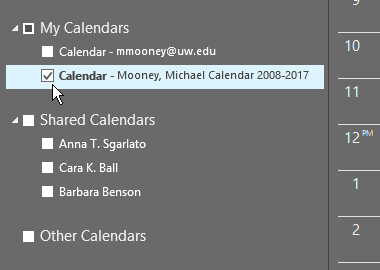
Below your own calendar(s), there should be an entry for Calendar - followed by the name of the PST file. Click the checkbox to view it.
If nothing is listed, you may need to click on the arrow to the left of My Calendars to expand its contents.
When you are done viewing a saved calendar:

Hold Ctrl and press 1 to return to Outlook’s normal Email view.
Scroll down in the folder list until the name of the PST file appears, then right-click on it and choose Close.
The PST file should disappear from the folder list.
Close Outlook completely to finish closing the PST file.
Once the mandatory retention period is up, you can delete the PST file just as you would any other type of file. If you receive an error message when you try to delete the PST file, it is likely because someone is currently accessing the file in Outlook.